By: Kevin Stone
Category: Flashing Leaks, Roofing

Fix Flashing Leaks and Protect You Home
Table of Contents
- Introduction a. Understanding Roof Leaks b. Advantages of Repairing Roof Leaks Yourself
- Identifying the Source of the Leak a. Inspection of the Attic b. Inspection of the Roof Exterior c. Hidden Leaks
- Tools and Materials Needed for Repair
- Repairing Common Roof Leak Sources a. Missing or Damaged Shingles b. Rusted Flashing c. Leaks Around Chimneys and Skylights d. Leaks in Vents or Pipes
- Prevention and Maintenance
- Conclusion
Roof leaks are a common problem for homeowners, causing costly damage and reducing the longevity of your roof. However, finding and fixing roof leaks doesn’t have to be a complicated or expensive process. With the right tools and a little bit of know-how, you can easily locate and repair roof leaks on your own.
Locating the Flashing Leak’s Origin

The first step in fixing flashing leaks is to identify where it’s coming from. To do so, inspect your roof both inside and outside. Start by checking the attic for any water stains or visible light from outside. If you find any, mark the location with a pencil. Then, go outside and look for visible signs of damage such as cracked or missing shingles, rusted flashing, or damage around chimneys and skylights. If you can’t find any visible damage, the leak might be coming from a hidden area such as a vent or a pipe, and a more thorough inspection is needed.
Essential Tools and Materials
Before you start the repair process, make sure you have the necessary tools and materials on hand. You’ll need: Roofing cement Roofing nails A hammer A pry bar A ladder A utility knife A caulk gun A trowel A bucket of water Repairing Common Roof Leak Sources Once you’ve identified the source of the leak, it’s time to repair it. Here are some common roof leak sources and how to fix them:
Fixing Common Leak Sources
Once you’ve found the source of the leak, it’s time to repair it. Here are the steps to fix common roof leak sources:
Missing or Damaged Shingles
Fix Flashing Leaks And Protect in Ohio – To replace a missing or damaged shingle, gently pry it up with a pry bar and remove the nails from the shingle above. Place the new shingle in its place, secure it with roofing nails, and apply roofing cement.

Rusted Flashing
To fix rusted flashing, cut around the old flashing with a utility knife and gently pry it up. Clean the area thoroughly, apply roofing cement, and place the new flashing in its place, securing it with roofing nails.
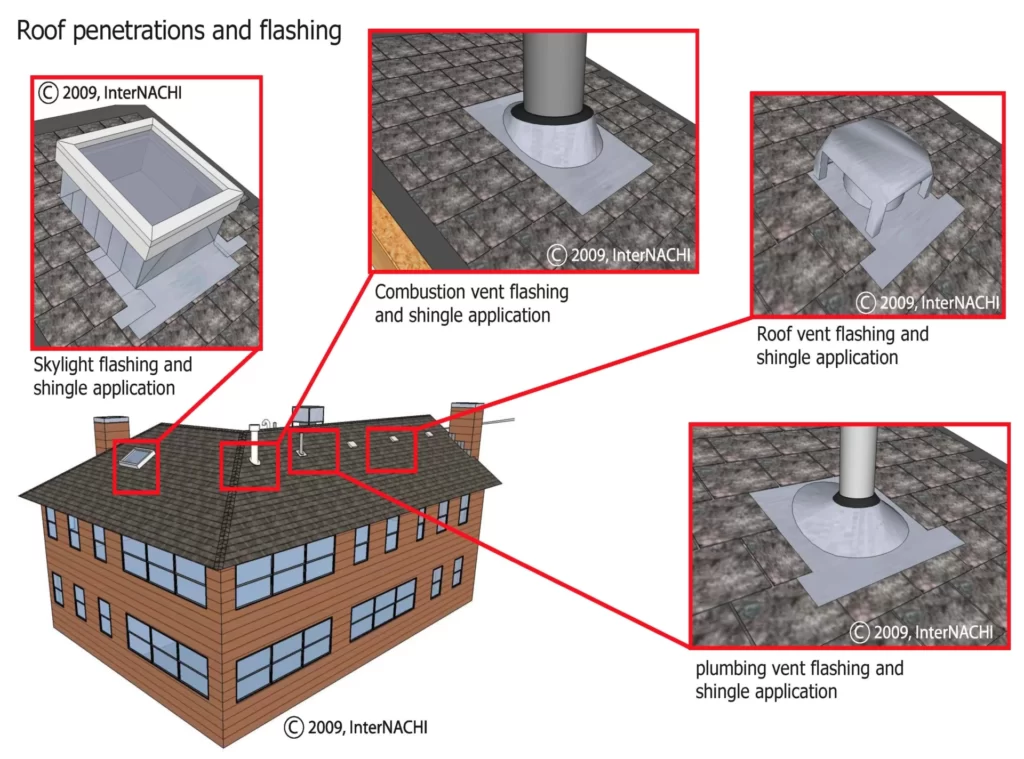
Leaks Around Chimneys and Skylights
Inspect the flashing around the chimney or skylight for cracks or damage. Remove the old flashing, clean the area thoroughly, apply roofing cement, and place the new flashing in its place, securing it with roofing nails.
Leaks in Vents or Pipes – To fix leaks in vents or pipes, inspect the seals for cracks or damage. Remove the old seals, clean the area thoroughly, apply roofing cement, and place new seals in their place.
It’s important to note that roof repair can be dangerous and it’s recommended to hire a professional if you’re not confident in your abilities.
Remember, fixing roof leaks as soon as they appear can prevent further damage and save you money in the long run.
About the Author: Kevin Stone, the CEO of Your Insurance Claims Network (YICN) and YICN Roofing, is a master of construction with over three decades of experience! A true professional with a specialty in roofing, storm damage restoration, and insurance claims, Kevin has garnered a reputation as a construction industry expert. With years of sharpening his skills and knowledge, he is a go-to authority in the field, possessing an intricate comprehension of construction, particularly roofing and storm damage restoration.